Using ACME to get certificates from Let’s Encrypt on pfSense
In this article, we will provide a comprehensive guide on utilizing pfSense to secure and manage your network by obtaining SSL/TLS certificates from Let's Encrypt, a free, automated, and open Certificate Authority (CA) that has gained immense popularity for its ease of use and widespread adoption across millions of websites. In recent years, many people have been using Let's Encrypt to secure their public domains. But what if I told you that the same can be done for private servers using a public domain name? In this guide, I'll show you how to obtain SSL certificates for servers within your private network. We will cover the step-by-step process, necessary configurations, and best practices to ensure a smooth and secure integration, making it easier for you to enhance the security of your online services.
ACME Package Installation
The first step is to install the ACME package from the pfSense package manager. This package will enable you to interact with Let's Encrypt and automate the process of obtaining and renewing SSL/TLS certificates.
To install the ACME package from the pfSense package manager, follow these steps:
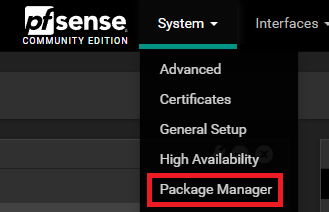
- Navigate to the Package Manager: Open your pfSense web interface and go to System > Package Manager.
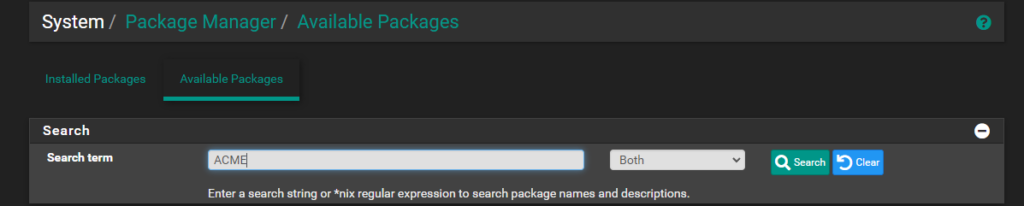
- Find the ACME Package: Click on the Available Packages tab. In the search bar, type "ACME" to quickly locate the package.
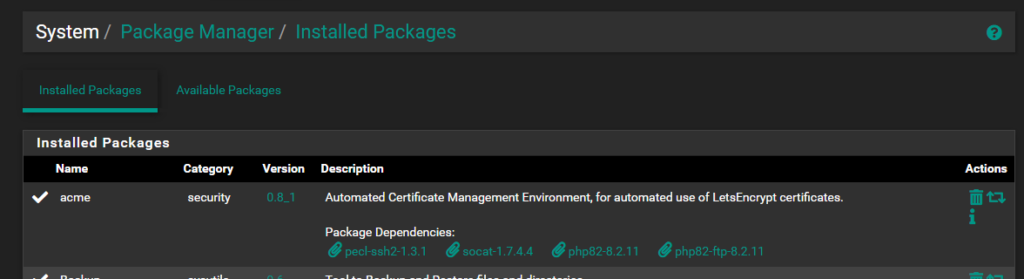
- Install the ACME Package: Once you find the ACME package in the list, click on the Install button next to it. Confirm the installation when prompted.
ACME Account Creation
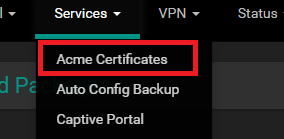
After installation, you can configure the ACME package by going to Services > ACME Certificates and setting up your account keys and certificate settings.
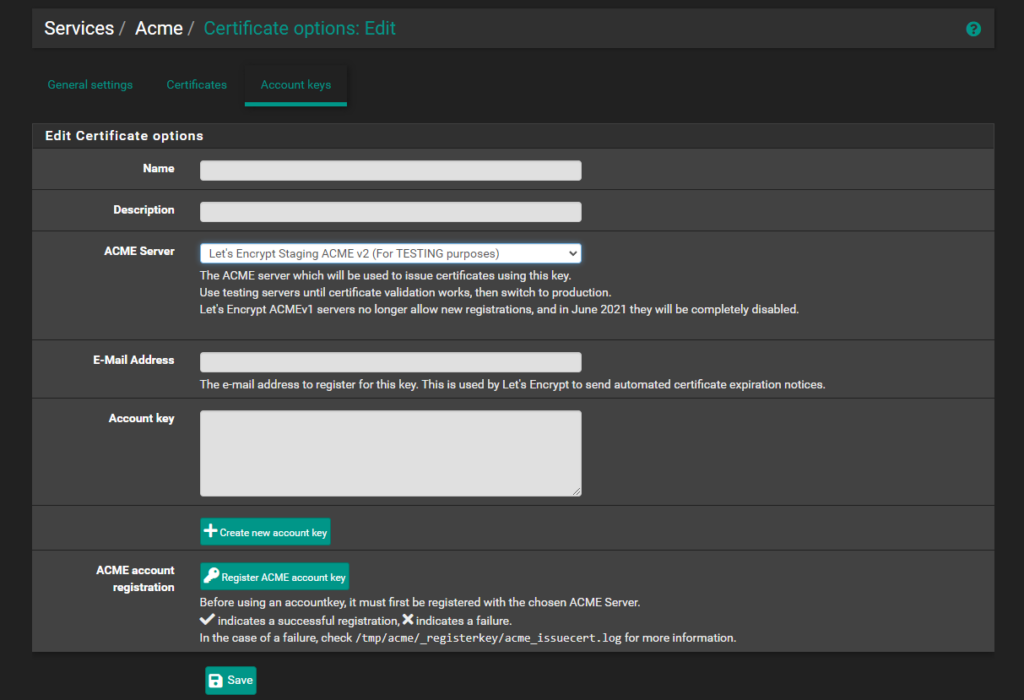
It is a good practice to create an account using the Let's Encrypt test server. This allows you to test your configuration without hitting rate limits or using up your quota for real certificates. To do this, navigate to Services > ACME Certificates, then go to the Account Keys tab. Fill in the required information, such as Name, Description, and Email address, and select "Let's Encrypt Staging ACME v2" as the ACME server. This ensures you are using the test server for initial setup and testing. Repeat the same step for production, this time choose "Let's Encrypt Production ACME v2". After creating and registering the account keys for both staging and production, you can proceed to create your SSL certificates.
Set Up the DNS Records
Before we proceed to SSL certificates, it's important to discuss DNS and the various methods ACME uses to validate domain names. Understanding these validation methods is crucial for successfully obtaining and managing your certificates.
ACME, the protocol used by Let's Encrypt, offers multiple methods for domain validation:
-
HTTP-01 Challenge: This method requires you to create a specific file on your web server. ACME validates the domain by making an HTTP request to check the presence of this file at http://<your-domain>/.well-known/acme-challenge/<token>. If the token matches, the domain is validated.
-
DNS-01 Challenge: In this method, you need to add a specific DNS TXT record to your domain's DNS settings. ACME validates the domain by querying the DNS TXT record for the correct token. This method is particularly useful for wildcard certificates, as it allows validation of an entire domain.
-
TLS-ALPN-01 Challenge: This method involves using a special TLS configuration on your web server. ACME validates the domain by connecting to your server over HTTPS and checking for a specific TLS extension. This method is suitable for environments where DNS changes are not feasible and HTTP-01 cannot be used.
Each of these methods has its use cases and requirements. The HTTP-01 challenge is the most straightforward but requires your web server to be publicly accessible. The DNS-01 challenge is versatile and works well for wildcard domains but requires access to your DNS configuration. The TLS-ALPN-01 challenge is less common but useful in specific scenarios where the other methods are not applicable.
As our servers are located in a private network that does not allow external traffic, we will be using the DNS-01 Challenge. This method allows us to validate our domain by adding a DNS TXT record, bypassing the need for external access to our servers. This is particularly advantageous for private networks, as it provides a secure and reliable way to obtain SSL certificates without exposing the internal infrastructure to the public internet.
Since the DNS TXT records are located outside of our private network, we will need a registered public domain and a public DNS service. This setup ensures that our DNS-01 Challenge can be completed successfully by allowing Let's Encrypt to query the DNS records and validate the domain ownership. By configuring a public DNS with the appropriate TXT records, we can seamlessly integrate Let's Encrypt certificates into our private network, enhancing security without compromising on privacy.
To further enhance security, we will be using DNS alias mode. This means that we will need to have two DNS services: one that manages our registered domain for private servers and another one simply for writing and validating the TXT records. By using this approach, we avoid exposing the API credentials of the DNS that manages the registered domain. The DNS alias mode allows us to delegate the DNS challenge to a secondary DNS service, ensuring that the sensitive credentials of our main DNS provider are kept secure.

I recommend using DuckDNS which is a free dynamic DNS service, as the secondary DNS for the DNS challenge. DuckDNS makes it easy to set up and manage the necessary DNS records for the DNS-01 Challenge without the need for complex configurations or additional costs.
DuckDNS
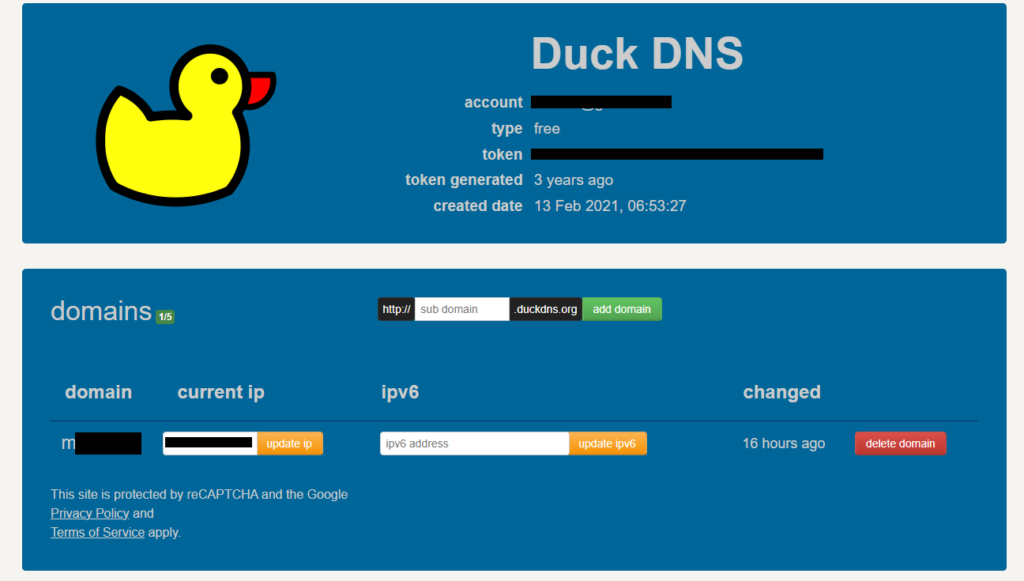
- Sign up for a free account at DuckDNS
- Add a DNS record in DuckDNS that will be used for the Domain Alias. We will configure the DNS record at the primary registrar to point to this domain by creating a CNAME record. The IP address here for this subdomain on DuckDNS does not matter.
Primary DNS
![]()
At the primary registrar, we will add a CNAME record to point to the domain that we have created in the previous step. We will need to prepend _acme-challenge to the subdomain.
_acme-challenge.subdomain.example.com IN CNAME aliasdomain.duckdns.org.Getting a New Certificate
- Navigate back to Services > ACME Certificates.
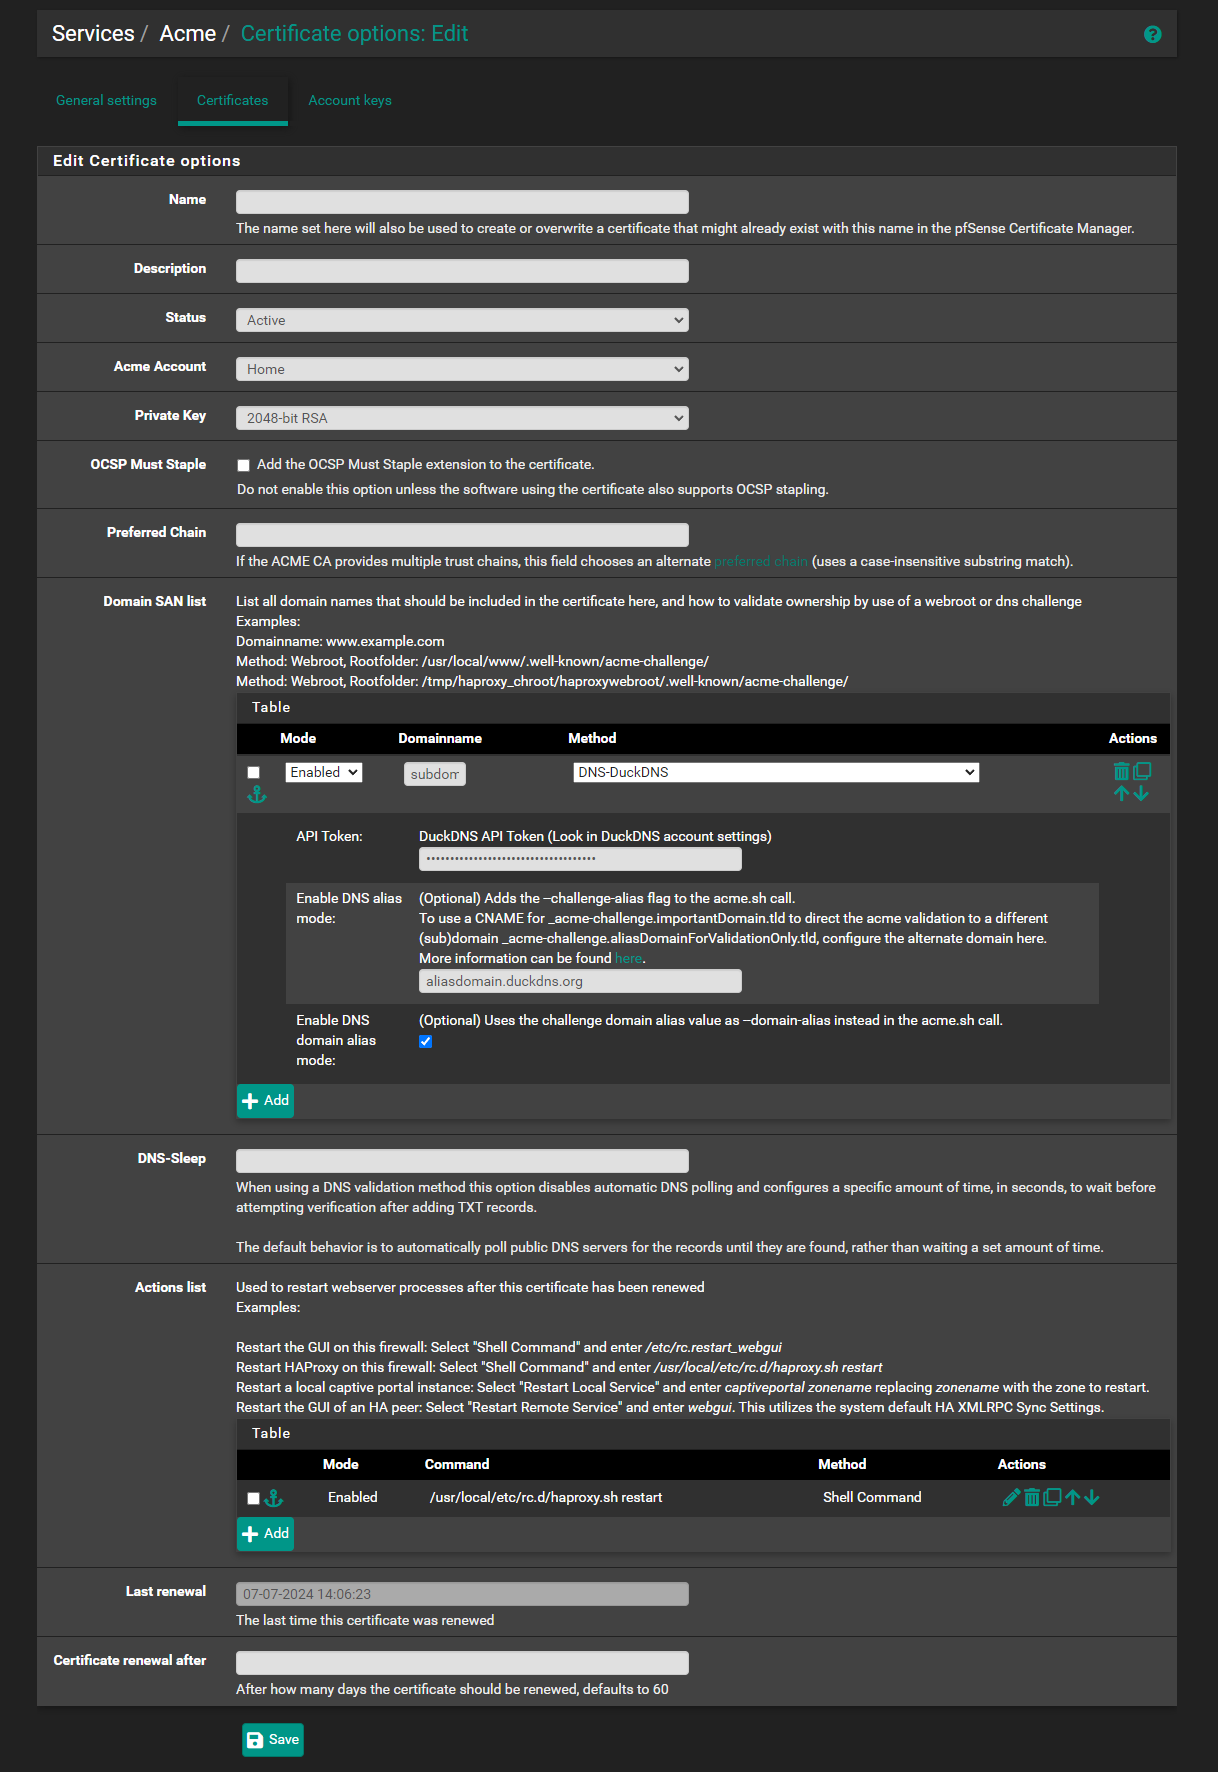
- Go to the Certificates tab and click on Add.
- Fill in the necessary details:
- Name: Enter a unique name for the certificate.
- Description: Provide an optional description.
- Status: Set to Active.
- Domain SAN list: click on Add.
- Mode: set to Enabled
- Domainname: set the domain name that we want to obtain the certificate. we may use wildcard domain too.
- Method: DNS-DuckDNS
- API Token: enter the DuckDNS API token
- Enable DNS Alias mode: aliasdomain.duckdns.org (This should be the alias domain that we have added on DuckDNS)
- Enable DNS domain alias mode: check this
- Actions list: Depending on the service that is using the certificate, we may wish to restart those services. e.g. HAProxy
Save the configuration and click on the Issue/Renew button to obtain the certificate.
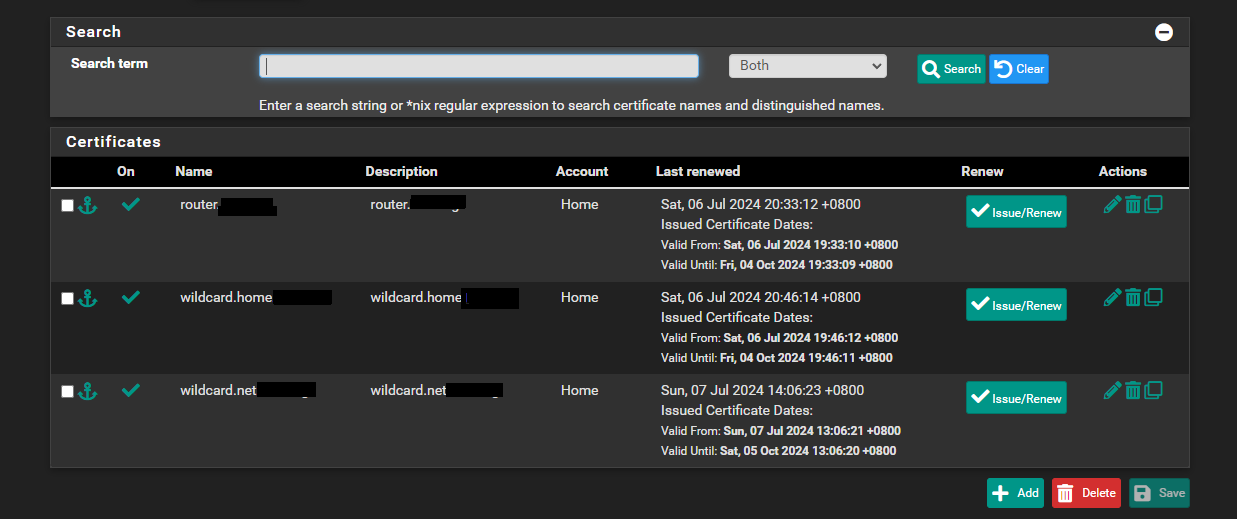
Now we may use these cerificates on pfsense.
2 Comments
EM · December 27, 2024 at 12:46 AM
This is, so far, a very helpful guide. However, I’m getting stuck at “adding a CNAME record at the primary registrar.” I fully don’t know what you mean by this. What primary registrar? DuckDNS? My internal DNS resolver on pfSense?
If DuckDNS, how? If in pfSense, in what manner?
My current setup is very basic, forwarding 443/80 to a separate machine that has my reverse proxy and other services, with pfSense being accessed through HTTPS on a randomly selected port. I do have a domain, but wanted to avoid needing to expose pfSense to the world at large, and it seems like your guide accomplishes this. I’m just completely lost on the CNAME portion.
Ultimately, I’m trying to obtain (auto-renewing) certs for my pfSense machine while keeping it 100% local. Also, acme seems to not like improper TLD’s, I.e. “example.lan”. I have my internal network set up on a “.lan” suffix and would ideally like to keep it that way, but won’t be broken up if I have to ditch it for something “proper.”
moxlotus · February 25, 2025 at 6:52 PM
You need a CNAME record in your DNS record which is managed by your domain registrar (this needs to be publicly accessible DNS). if you are using private domain such as “example.lan”. you can only use a self-signed certificate. The guide above assumes that you have purchased a domain from a domain registrar.